You don't need a specialist camera, a biomechanics lab, or an expensive coach present to film a useful bowling action video. A modern smartphone — the one in your pocket right now — is genuinely capable of capturing everything needed for a high-quality biomechanical analysis.
But the setup matters enormously. A great phone filming from the wrong angle gives you useless footage. Here's exactly how to do it right.
Bowling: Camera Angles
CricMotion analyses bowling from up to three camera positions. The side-on angle is mandatory — it's where the majority of metrics are measured. The front-on and back-on angles are supplementary and unlock additional metrics if you have a second person to film or can reposition between overs.
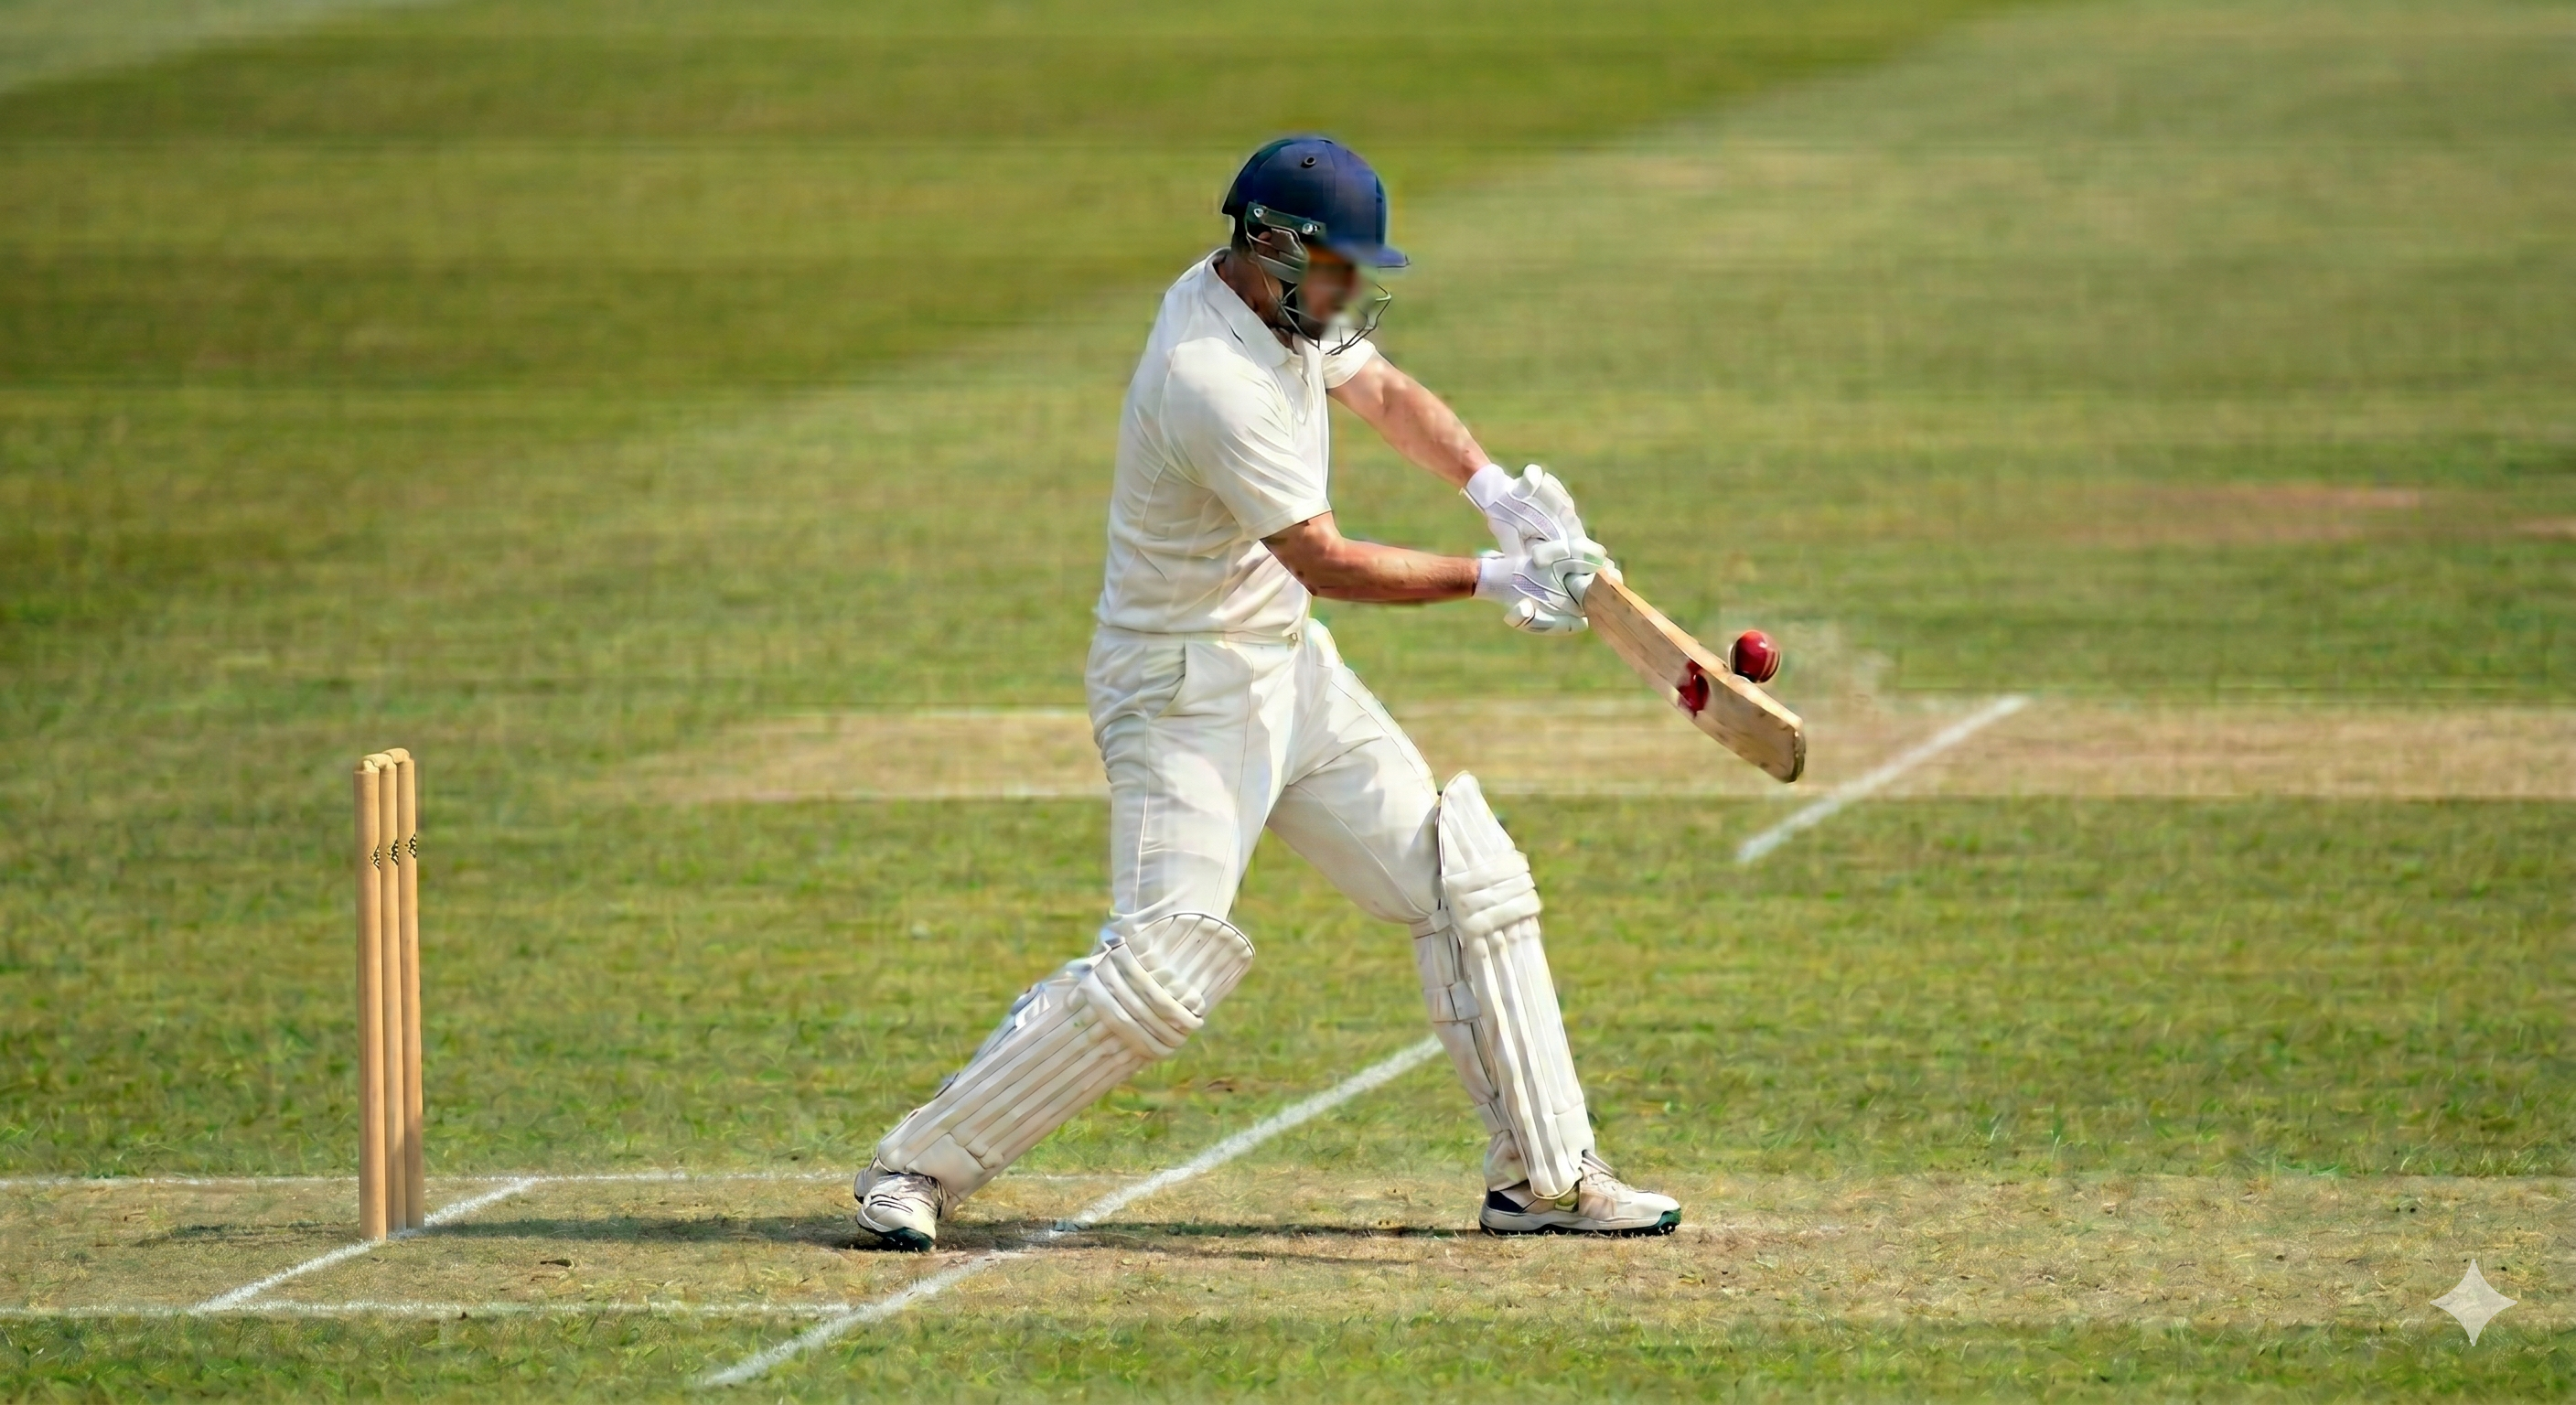
Angle 1: Side-On — Primary (Required)
Position the camera at exactly 90 degrees to the bowling crease — directly at the bowler's side, at square-leg. Not slightly in front. Not slightly behind. Dead side-on. This is where the majority of biomechanical measurement happens.
This angle captures: run-up stride lengths, bound height, back-foot landing, front-foot plant and knee angle, arm arc and release point height, hip-shoulder separation, and follow-through completeness.

Side-on angle: Camera at square-leg, 90° to the line of play. Phone at hip height, 5–7 m from the crease. The bowler's full body — run-up to follow-through — should be visible throughout.
"Stand at the side of the crease, not the end. If you can see the bowler's face clearly in your camera, you're in the wrong position. You should see their side profile — like a silhouette. That's the right angle."
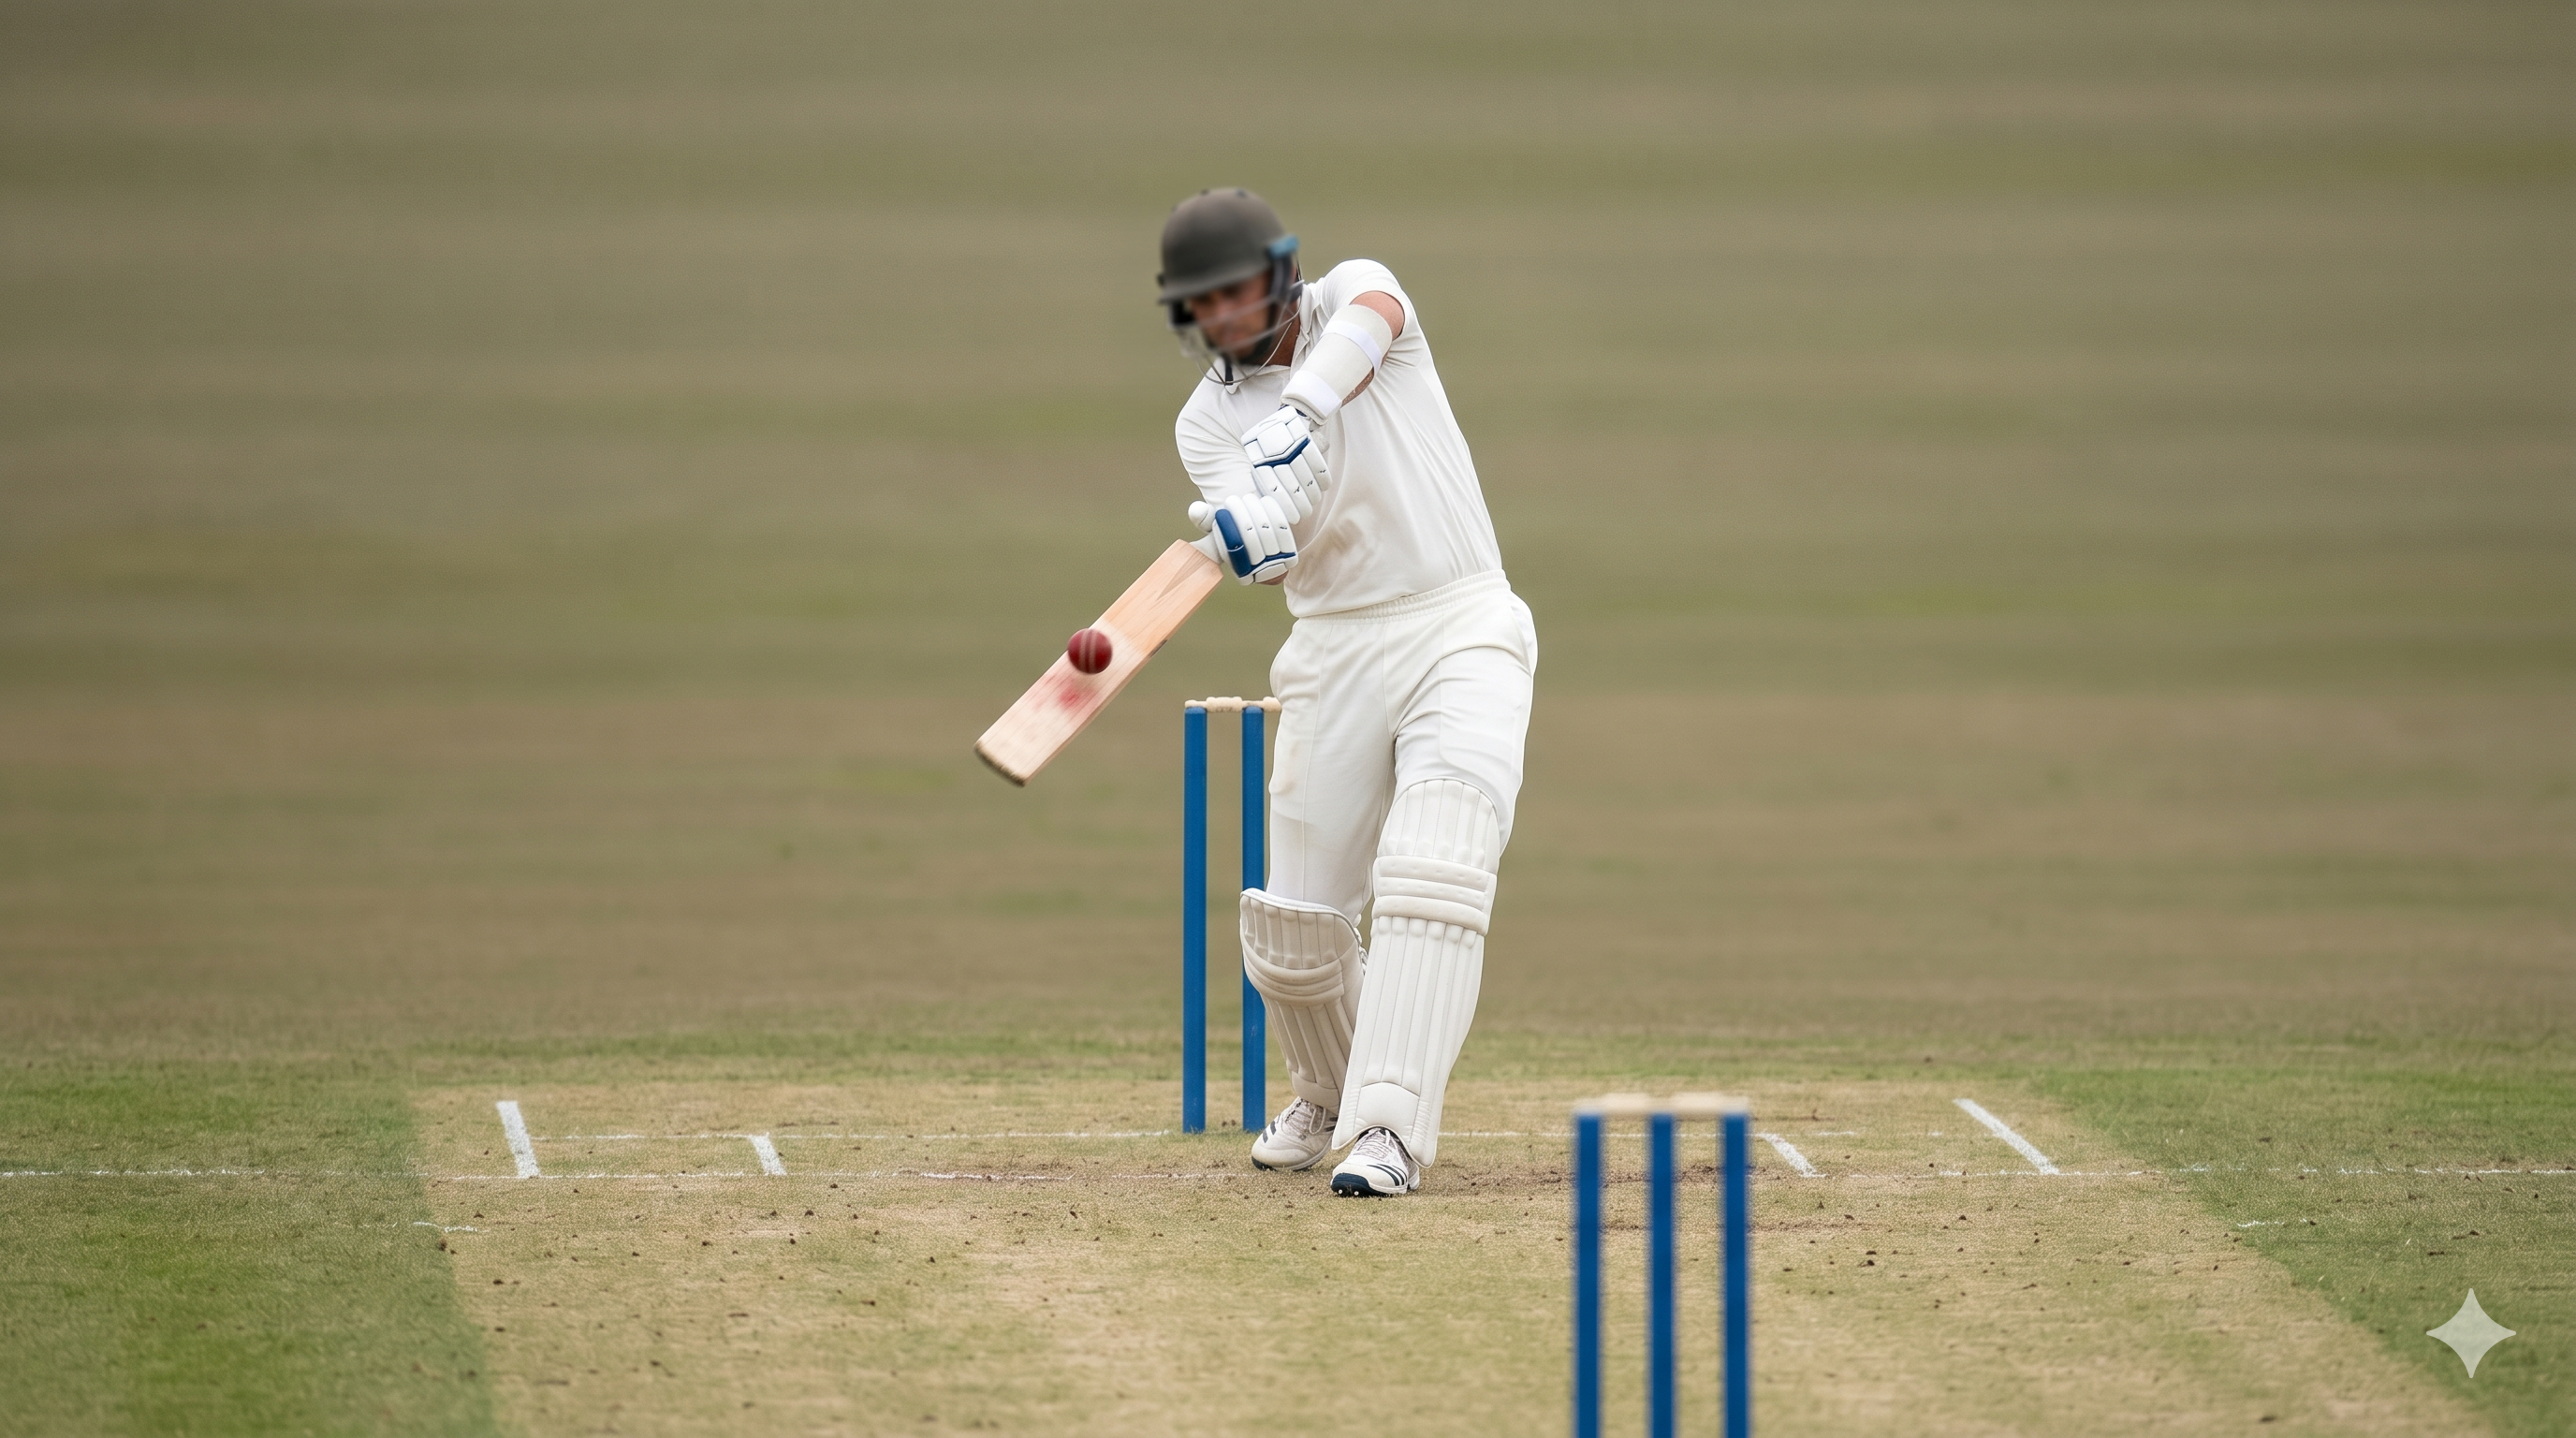
Angle 2: Front-On — Supplementary
Place the camera behind the bowler's stumps, at the bowling end, facing down the pitch toward the batter. This looks down the length of the pitch and captures the action from behind the bowler.
This angle captures: front-foot transit timing, arm-loaded to release time, delivery-stride total time, and wrist position at release. It also reveals how straight the bowler's action is from behind — useful for identifying drift in alignment across the crease.

Front-on angle: Camera positioned behind the bowler's stumps, facing toward the batter. Captures arm path, wrist position at release, and delivery-stride timing from behind.
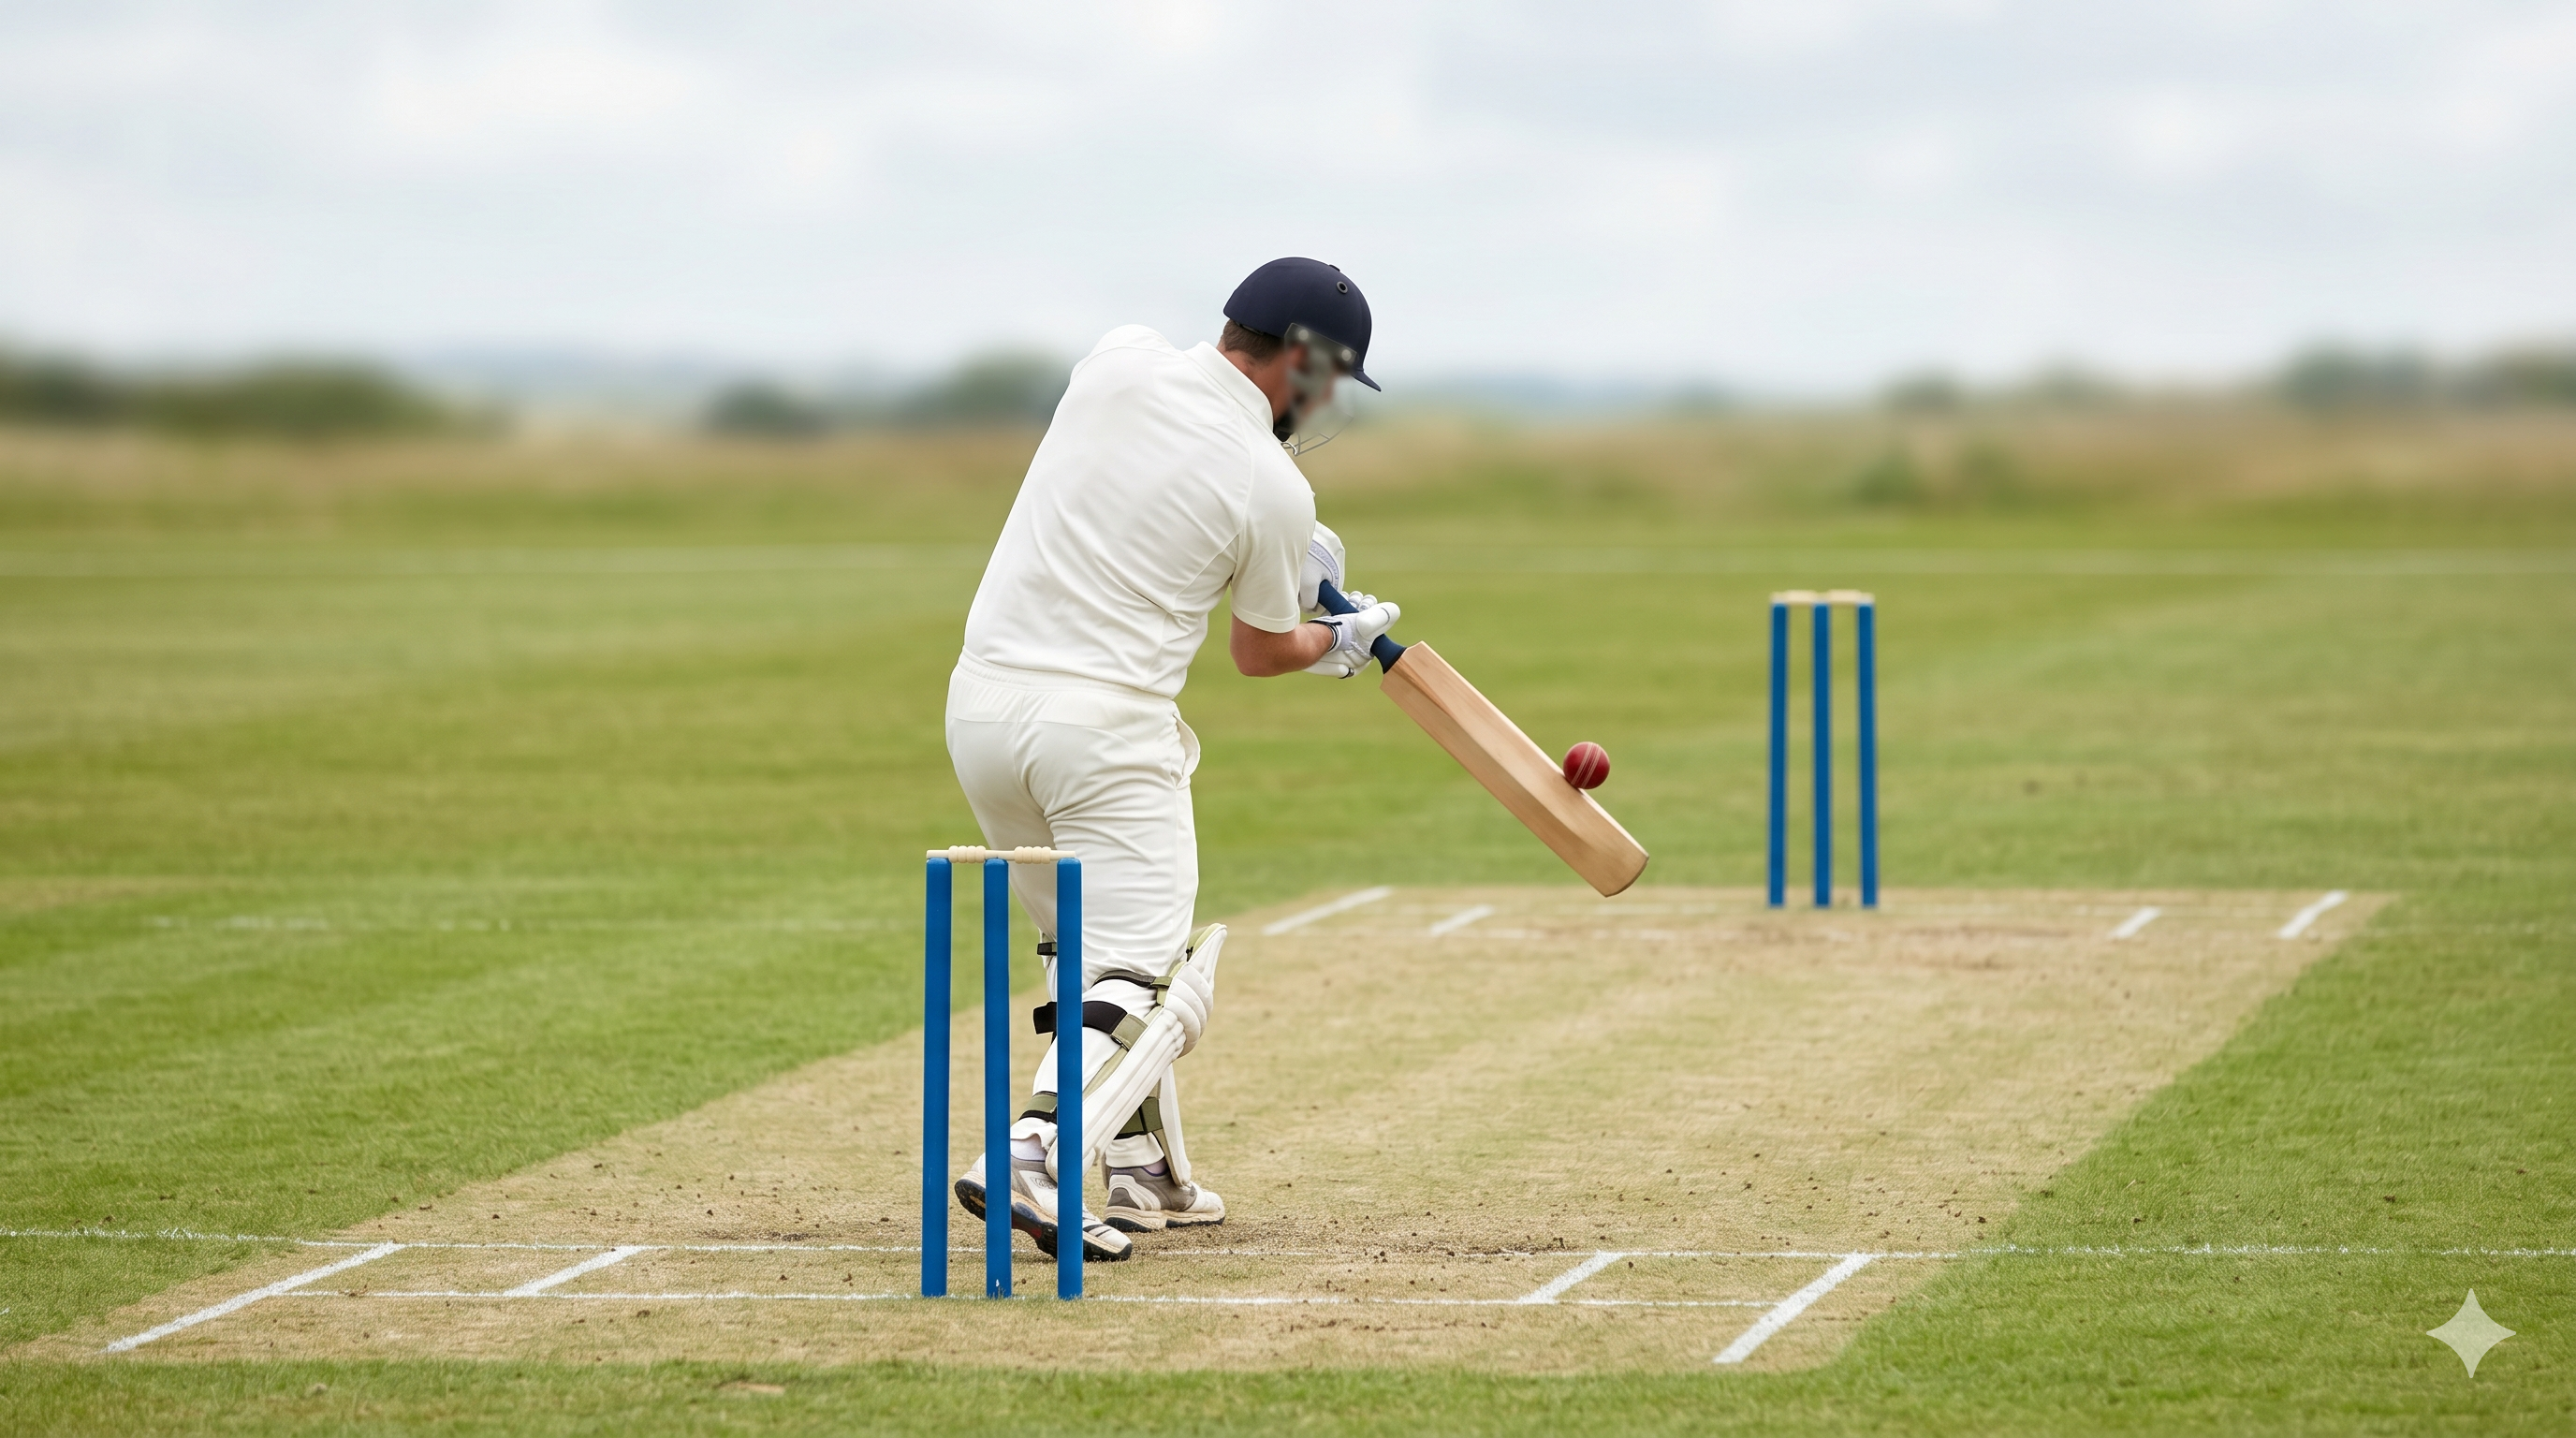
Angle 3: Back-On — Supplementary
Place the camera behind the batter, at the non-striker's end, facing toward the bowler. This looks up the pitch from the batting end, giving a direct face-on view of the bowler through the delivery.
This angle captures: back-foot alignment at back-foot contact, front-foot transit, arm-loaded to release time, and delivery-stride timing. It's particularly useful for identifying mixed action — the most common injury risk pattern in junior fast bowlers.

Back-on angle: Camera positioned behind the batter at the non-striker's end, facing toward the bowler. Captures back-foot alignment, front-foot transit, and full delivery stride from the front.
Camera Height
Set the phone at roughly hip height of the bowler — not at ground level and not at head height. Hip height gives the most useful perspective on hip-shoulder separation and delivery stride positioning.
Don't hold the phone. Prop it against a cricket bag, use a small tripod, or wedge it between two stumps. A shaky video is significantly harder to analyse accurately.
Phone Settings
Getting the right settings takes 30 seconds and significantly improves analysis quality.
iPhone
- Go to Settings → Camera → Record Video → 1080p HD at 60 fps — this gives the sharpest skeleton tracking.
- For ball-speed accuracy on bowling clips: Settings → Camera → Record Slo-mo → 1080p at 240 fps.
- Disable Auto FPS — it defaults to 30 fps in low light, which is too slow for reliable tracking.
- Turn OFF "SuperSteady" or "Action mode" — both crop the frame and can drop the player off the edge mid-action.
Android (Samsung / Xiaomi / Realme / Vivo / Oppo / OnePlus)
- Open the native Camera app → Video → tap the resolution chip on screen → choose FHD 1080p · 60fps.
- For bowling speed: use Super Slow-Mo mode (240 / 480 / 960 fps) when the ball needs to be tracked.
- Switch off HDR Video + Video Boost — both re-process frames in ways that can blur the release moment.
- Use the back/main camera (not telephoto or wide) — the main sensor has the best motion fidelity and low-light performance.
Distance from the Bowler
You want the bowler to fill roughly 60–70% of the frame height at the moment of delivery. Too far away and the joint positions are too small to analyse accurately. Too close and you cut off the run-up or follow-through.
The correct distance for the side-on angle is 5–7 metres from the crease. At this distance the ball stays large enough in the frame for the AI to track it through flight — important for ball-speed accuracy. At 20+ metres (pavilion view), the ball becomes too small for reliable detection.
Lighting
Outdoor daylight is ideal. Avoid filming with strong sunlight directly behind the bowler — this creates a silhouette with no visible detail. Morning sessions (before 10am) or late afternoon (after 4pm) give the best lighting with the sun lower and at an angle.
Indoor net sessions are fine if the facility has reasonable lighting. Avoid very dark nets where the phone is struggling to focus.
How Many Deliveries to Record
For a complete CricMotion analysis, you need a minimum of 6 deliveries (the ICC standard). 10 deliveries is recommended for the most accurate analysis — this allows the AI to average out natural variation and identify consistent patterns vs. one-off anomalies.
Record all deliveries in the same video clip if possible. Change the format only if you want to analyse a specific delivery type separately (e.g., yorkers vs. standard lengths).
Batting: Camera Angles
Batting analysis uses the same three-angle framework as bowling. The side-on angle is again the primary one — it's where the most important metrics are captured. Set up exactly as you would for bowling, positioned at square-leg to the batsman.
Angle 1: Side-On — Primary (Required)
Position the camera at square-leg, at 90 degrees to the crease. The batter should be fully visible from stance through to follow-through, with the stumps visible at the edge of frame. Hip height, 5–7 metres from the crease.
This angle captures: stance width, front-foot stride length and timing, front-knee flex at impact, weight transfer, backlift height, bat-face angle at contact, and bat finish height.
Side-on angle for batting: Camera at square-leg, 90° to the crease, at hip height. Full body from stance to follow-through must remain in frame throughout the shot.
Angle 2: Front-On — Supplementary
Position the camera at the bowler's end, behind the bowling stumps, facing toward the batter. This gives a direct face-on view of the batter through their stance, trigger movement, and shot execution.
This angle captures: head stillness, lateral weight shift, bottom-hand dominance, hip rotation, and bat-path straightness through the hitting zone.
Front-on angle for batting: Camera behind the bowling stumps, facing the batter. Captures head position, weight transfer, and bat-path through contact.
Angle 3: Back-On — Supplementary
Position the camera behind the batter, at the non-striker's end, facing the bowler. This shows the batter from behind, looking in the same direction they're facing. It's particularly useful for seeing shoulder alignment, trigger movement, and how the batter loads into the shot.
This angle captures: shoulder tilt, initial weight transfer direction, trigger step pattern, and upper-body rotation through the downswing.
Back-on angle for batting: Camera behind the batter, looking toward the bowler. Reveals shoulder alignment, trigger movement, and how the batter loads and rotates into the shot.
📱 Ready to Upload?
Once you've filmed from the side-on angle, you can upload your video directly to CricMotion. Our AI analyses your bowling or batting and delivers a full report with Coach Arjun's personalised feedback. Try it free — no card needed →
Quick Checklist Before You Press Record
All disciplines
- ☑ Camera at 90 degrees to the crease for side-on (primary angle)
- ☑ Phone propped stable — not handheld
- ☑ Hip height of the player
- ☑ 5–7 metres from the crease (side-on angle)
- ☑ Full body in frame, start to finish — run-up/stance to follow-through
- ☑ Solo player — others step out of frame
- ☑ Good natural lighting (avoid backlit shots)
- ☑ SuperSteady / Action mode turned OFF
- ☑ 1080p at 60fps minimum; slo-mo (240fps) for ball-speed accuracy
- ☑ Main/back camera — not telephoto or wide
Bowling
- ☑ Minimum 6 deliveries in the recording (10 recommended)
- ☑ Full run-up and complete follow-through visible in frame
- ☑ Optional: supplementary front-on and back-on clips for additional metrics
Batting
- ☑ Minimum 10 shots recorded
- ☑ Full stance through to follow-through visible in frame
- ☑ Optional: supplementary front-on and back-on clips for additional metrics
What Happens After You Upload
Once your video is uploaded to CricMotion, our AI processes it phase by phase — run-up, bound, delivery stride, release, and follow-through for bowling; stance, backswing, downswing, and follow-through for batting. You receive a CricMotion Score (0–100) with a letter grade, phase-by-phase breakdown, injury risk flags, and a personalised coaching note from Coach Arjun.
The whole process — from upload to report — takes minutes on Pro plan, and starts with 60 seconds of setup with your phone.
⚠️ AI-Generated Content Disclosure: This article was created with the assistance of artificial intelligence by the CricMotion team. All biomechanical references are grounded in established cricket sports science research. Content is intended for educational purposes. CricMotion is an AI-powered cricket analysis platform — not a substitute for qualified coaching. © 2026 CricMotion. All rights reserved.